android基础之自定义View与ViewGroup

一 概述

在android应用开发过程中,固定的一些控件和属性可能满足不了开发的需求,所以在一些特殊情况下,我们需要自定义控件与属性。ViewGroup亦继承于View,下面看View的绘制过程:
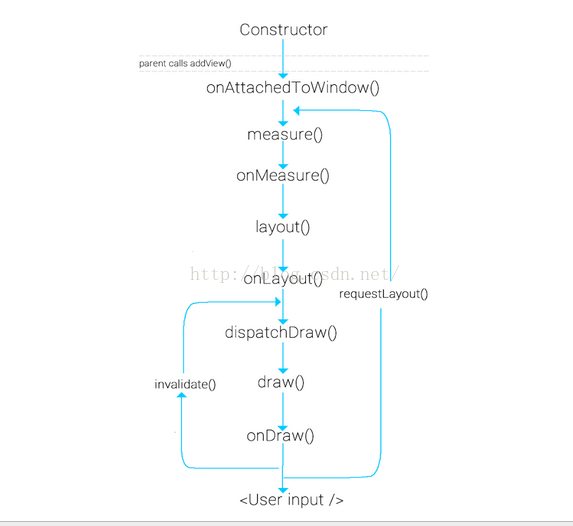
二 自定义View

1. 实现步骤
  1. 继承View类或其子类 
  2. 复写view中的一些函数
  3. 为自定义View类增加属性(两种方式)
  4. 绘制控件(导入布局)
  5. 响应用户事件
  6. 定义回调函数(根据自己需求来选择)
2.哪些方法需要被重写
  • onDraw()
    view中onDraw()是个空函数,也就是说具体的视图都要覆写该函数来实现自己的绘制。对于ViewGroup则不需要实现该函数,因为作为容器是“没有内容“的(但必须实现dispatchDraw()函数,告诉子view绘制自己)。

  • onLayout()
    主要是为viewGroup类型布局子视图用的,在View中这个函数为空函数。

  • onMeasure()
    用于计算视图大小(即长和宽)的方式,并通过setMeasuredDimension(width, height)保存计算结果。

  • onTouchEvent
    定义触屏事件来响应用户操作。

还有一些不常用的方法:

  • onKeyDown 当按下某个键盘时  
  • onKeyUp 当松开某个键盘时        
  • onTrackballEvent 当发生轨迹球事件时        
  • onSizeChange() 当该组件的大小被改变时        
  • onFinishInflate() 回调方法,当应用从XML加载该组件并用它构建界面之后调用的方法        
  • onWindowFocusChanged(boolean) 当该组件得到、失去焦点时     
  • onAttachedToWindow() 当把该组件放入到某个窗口时        
  • onDetachedFromWindow() 当把该组件从某个窗口上分离时触发的方法        
  • onWindowVisibilityChanged(int): 当包含该组件的窗口的可见性发生改变时触发的方法  
3. 自定义控件的三种方式
  • 继承已有的控件
    当要实现的控件和已有的控件在很多方面比较类似, 通过对已有控件的扩展来满足要求。

  • 继承一个布局文件
    一般用于自定义组合控件,在构造函数中通过inflater和addView()方法加载自定义控件的布局文件形成图形界面(不需要onDraw方法)。

  • 继承view
    通过onDraw方法来绘制出组件界面。

4. 自定义属性的两种方法
  • 在布局文件中直接加入属性,在构造函数中去获得。
1
2
3
4
5
6
7
8
9
10
<RelativeLayout xmlns:android="http://schemas.android.com/apk/res/android"
android:layout_width="match_parent"
android:layout_height="match_parent"
>
<com.example.demo.myView
android:layout_width="wrap_content"
android:layout_height="wrap_content"
Text="@string/hello_world"
/>
</RelativeLayout>

获取属性值:

1
2
3
4
5
6
public myView(Context context, AttributeSet attrs) {
super(context, attrs);
// TODO Auto-generated constructor stub
int textId = attrs.getAttributeResourceValue(null, "Text", 0);
String text = context.getResources().getText(textId).toString();
}
  • 在res/values/ 下建立一个attrs.xml 来声明自定义view的属性。

可以定义的属性有:

1
2
3
4
5
6
7
8
9
10
11
12
13
14
15
16
17
18
19
20
21
22
23
24
25
26
27
28
29
30
31
32
33
<declare-styleable name = "名称"> 
//参考某一资源ID (name可以随便命名)
<attr name = "background" format = "reference" />
//颜色值
<attr name = "textColor" format = "color" />
//布尔值
<attr name = "focusable" format = "boolean" />
//尺寸值
<attr name = "layout_width" format = "dimension" />
//浮点值
<attr name = "fromAlpha" format = "float" />
//整型值
<attr name = "frameDuration" format="integer" />
//字符串
<attr name = "text" format = "string" />
//百分数
<attr name = "pivotX" format = "fraction" />

//枚举值
<attr name="orientation">
<enum name="horizontal" value="0" />
<enum name="vertical" value="1" />
</attr>

//位或运算
<attr name="windowSoftInputMode">
<flag name = "stateUnspecified" value = "0" />
<flag name = "stateUnchanged" value = "1" />
</attr>

//多类型
<attr name = "background" format = "reference|color" />
</declare-styleable>

attrs.xml进行属性声明

1
2
3
4
5
6
7
<?xml version="1.0" encoding="utf-8"?>
<resources>
<declare-styleable name="myView">
<attr name="text" format="string"/>
<attr name="textColor" format="color"/>
</declare-styleable>
</resources>

添加到布局文件

1
2
3
4
5
6
7
8
9
10
11
12
<RelativeLayout xmlns:android="http://schemas.android.com/apk/res/android"
android:layout_width="match_parent"
android:layout_height="match_parent"
xmlns:myview="http://schemas.android.com/apk/com.example.demo"
>
<com.example.demo.myView
android:layout_width="wrap_content"
android:layout_height="wrap_content"
myview:text = "test"
myview:textColor ="#ff0000"
/>
</RelativeLayout>

这里注意命名空间: xmlns:前缀=”http://schemas.android.com/apk/res/包名(或res-auto)”.

在构造函数中获取属性值:

1
2
3
4
5
6
7
8
9
public myView(Context context, AttributeSet attrs) {
super(context, attrs);
// TODO Auto-generated constructor stub
TypedArray a = context.obtainStyledAttributes(attrs, R.styleable.myView);
String text = a.getString(R.styleable.myView_text);
int textColor = a.getColor(R.styleable.myView_textColor, Color.WHITE);

a.recycle();
}

或者:

1
2
3
4
5
6
7
8
9
10
11
12
13
14
15
16
17
18
19
20
public myView(Context context, AttributeSet attrs) {
super(context, attrs);
// TODO Auto-generated constructor stub
TypedArray a = context.obtainStyledAttributes(attrs, R.styleable.myView);
int n = a.getIndexCount();
for(int i=0;i<n;i++){
int attr = a.getIndex(i);
switch (attr) {
case R.styleable.myView_text:

break;

case R.styleable.myView_textColor:

break;

}
}
a.recycle();
}
5.代码示例

实现一个随手指移动的小球。具体步骤:

  • 在res/values/ 下建立一个attrs.xml 来声明自定义view的属性
  • 一个继承View并复写部分函数的自定义view的类
  • 一个展示自定义view 的容器界面

a .自定义view命名为myView,它有一个属性值,格式为color

1
2
3
4
5
6
<?xml version="1.0" encoding="utf-8"?>
<resources>
<declare-styleable name="myView">
<attr name="TextColor" format="color"/>
</declare-styleable>
</resources>

b. 在构造函数获取获得view的属性配置和复写onDraw和onTouchEvent函数实现绘制界面和用户事件响应

1
2
3
4
5
6
7
8
9
10
11
12
13
14
15
16
17
18
19
20
21
22
23
24
25
26
27
28
29
30
31
32
33
34
35
36
37
public class myView extends View{
//定义画笔和初始位置
Paint p = new Paint();
public float currentX = 50;
public float currentY = 50;
public int textColor;

public myView(Context context, AttributeSet attrs) {
super(context, attrs);
//获取资源文件里面的属性,由于这里只有一个属性值,不用遍历数组,直接通过R文件拿出color值
//把属性放在资源文件里,方便设置和复用
TypedArray array = context.obtainStyledAttributes(attrs,R.styleable.myView);
textColor = array.getColor(R.styleable.myView_TextColor,Color.BLACK);
array.recycle();
}

@Override
protected void onDraw(Canvas canvas) {
super.onDraw(canvas);
//画一个蓝色的圆形
p.setColor(Color.BLUE);
canvas.drawCircle(currentX,currentY,30,p);
//设置文字和颜色,这里的颜色是资源文件values里面的值
p.setColor(textColor);
canvas.drawText("BY finch",currentX-30,currentY+50,p);
}

@Override
public boolean onTouchEvent(MotionEvent event) {


currentX = event.getX();
currentY = event.getY();
invalidate();//重新绘制图形
return true;
}
}

这里通过不断的更新当前位置坐标和重新绘制图形实现效果,要注意的是使用TypedArray后一定要记得recycle(). 否则会对下次调用产生影响。

c. 把myView加入到activity_main.xml布局里面

1
2
3
4
5
6
7
8
9
10
11
12
13
14
15
16
17
18
19
<?xml version="1.0" encoding="utf-8"?>
<RelativeLayout xmlns:android="http://schemas.android.com/apk/res/android"
xmlns:tools="http://schemas.android.com/tools"
android:layout_width="match_parent"
android:layout_height="match_parent"
xmlns:myview="http://schemas.android.com/apk/res-auto"
android:paddingBottom="@dimen/activity_vertical_margin"
android:paddingLeft="@dimen/activity_horizontal_margin"
android:paddingRight="@dimen/activity_horizontal_margin"
android:paddingTop="@dimen/activity_vertical_margin"
tools:context="finch.scu.cn.myview.MainActivity">


<finch.scu.cn.myview.myView
android:layout_width="match_parent"
android:layout_height="match_parent"
myview:TextColor="#ff0000"
/>
</RelativeLayout>

d. 最后是MainActivity

1
2
3
4
5
6
7
8
public class MainActivity extends AppCompatActivity {

@Override
protected void onCreate(Bundle savedInstanceState) {
super.onCreate(savedInstanceState);
setContentView(R.layout.activity_main);
}
}

注:具体的view要根据具体的需求来,比如我们要侧滑删除的listview我们可以继承listview,监听侧滑事件,显示删除按钮实现功能。

三 自定义ViewGroup

自定义ViewGroup比自定义View要麻烦一些,因为ViewGroup需要去计算子View的大小以此来改变ViewGroup的大小,同时我们还要知道子View的摆放顺序。

1.源码分析

等我看了再说

自定义ViewGroup的时候一般复写:

  • onMeasure()方法:
    计算childView的测量值以及模式,以及设置自己的宽和高    
  • onLayout()方法
    对其所有childView的位置进行定位
2.代码示例
  • onMeasure方法
1
2
3
4
5
6
7
8
9
10
11
12
13
14
15
16
17
18
19
20
21
22
23
24
25
26
27
28
29
30
31
32
33
34
35
36
37
38
39
40
41
42
43
44
45
46
47
48
49
50
51
52
53
54
55
56
57
58
59
60
61
62
63
64
65
66
67
68
69
70
71
72
73
@Override
protected void onMeasure(int widthMeasureSpec, int heightMeasureSpec)
{
// 获得它的父容器为它设置的测量模式和大小
int sizeWidth = MeasureSpec.getSize(widthMeasureSpec);
int modeWidth = MeasureSpec.getMode(widthMeasureSpec);
int sizeHeight = MeasureSpec.getSize(heightMeasureSpec);
int modeHeight = MeasureSpec.getMode(heightMeasureSpec);

// 用于warp_content情况下,来记录父view宽和高
int width = 0;
int height = 0;

// 取每一行宽度的最大值
int lineWidth = 0;
// 每一行的高度累加
int lineHeight = 0;

// 获得子view的个数
int cCount = getChildCount();

for (int i = 0; i < cCount; i++)
{
View child = getChildAt(i);
// 测量子View的宽和高(子view在布局文件中是wrap_content)
measureChild(child, widthMeasureSpec, heightMeasureSpec);
// 得到LayoutParams
MarginLayoutParams lp = (MarginLayoutParams) child.getLayoutParams();

// 根据测量宽度加上Margin值算出子view的实际宽度(上文中有说明)
int childWidth = child.getMeasuredWidth() + lp.leftMargin + lp.rightMargin;
// 根据测量高度加上Margin值算出子view的实际高度
int childHeight = child.getMeasuredHeight() + lp.topMargin+ lp.bottomMargin;

// 这里的父view是有padding值的,如果再添加一个元素就超出最大宽度就换行
if (lineWidth + childWidth > sizeWidth - getPaddingLeft() - getPaddingRight())
{
// 父view宽度=以前父view宽度、当前行宽的最大值
width = Math.max(width, lineWidth);
// 换行了,当前行宽=第一个view的宽度
lineWidth = childWidth;
// 父view的高度=各行高度之和
height += lineHeight;
//换行了,当前行高=第一个view的高度
lineHeight = childHeight;
} else{
// 叠加行宽
lineWidth += childWidth;
// 得到当前行最大的高度
lineHeight = Math.max(lineHeight, childHeight);
}
// 最后一个控件
if (i == cCount - 1)
{
width = Math.max(lineWidth, width);
height += lineHeight;
}
}
/**
* EXACTLY对应match_parent 或具体值
* AT_MOST对应wrap_content
* 在FlowLayout布局文件中
* android:layout_width="fill_parent"
* android:layout_height="wrap_content"
*
* 如果是MeasureSpec.EXACTLY则直接使用父ViewGroup传入的宽和高,否则设置为自己计算的宽和高。
*/
setMeasuredDimension(
modeWidth == MeasureSpec.EXACTLY ? sizeWidth : width + getPaddingLeft() + getPaddingRight(),
modeHeight == MeasureSpec.EXACTLY ? sizeHeight : height + getPaddingTop()+ getPaddingBottom()
);

}
  • onLayout方法
1
2
3
4
5
6
7
8
9
10
11
12
13
14
15
16
17
18
19
20
21
22
23
24
25
26
27
28
29
30
31
32
33
34
35
36
37
38
39
40
41
42
43
44
45
46
47
48
49
50
51
52
53
54
55
56
57
58
59
60
61
62
63
64
65
66
67
68
69
70
71
72
73
74
75
76
77
78
79
80
81
82
83
84
85
86
87
88
89
90
91
92
93
94
95
96
97
98
99
100
101
102
//存储所有的View
private List<List<View>> mAllViews = new ArrayList<List<View>>();
//存储每一行的高度
private List<Integer> mLineHeight = new ArrayList<Integer>();

@Override
protected void onLayout(boolean changed, int l, int t, int r, int b)
{
mAllViews.clear();
mLineHeight.clear();

// 当前ViewGroup的宽度
int width = getWidth();

int lineWidth = 0;
int lineHeight = 0;
// 存储每一行所有的childView
List<View> lineViews = new ArrayList<View>();

int cCount = getChildCount();

for (int i = 0; i < cCount; i++)
{
View child = getChildAt(i);
MarginLayoutParams lp = (MarginLayoutParams) child.getLayoutParams();

int childWidth = child.getMeasuredWidth();
int childHeight = child.getMeasuredHeight();

lineWidth += childWidth + lp.leftMargin + lp.rightMargin;
lineHeight = Math.max(lineHeight, childHeight + lp.topMargin+ lp.bottomMargin);
lineViews.add(child);

// 换行,在onMeasure中childWidth是加上Margin值的
if (childWidth + lineWidth + lp.leftMargin + lp.rightMargin > width - getPaddingLeft() - getPaddingRight())
{
// 记录行高
mLineHeight.add(lineHeight);
// 记录当前行的Views
mAllViews.add(lineViews);

// 新行的行宽和行高
lineWidth = 0;
lineHeight = childHeight + lp.topMargin + lp.bottomMargin;
// 新行的View集合
lineViews = new ArrayList<View>();
}

}
// 处理最后一行
mLineHeight.add(lineHeight);
mAllViews.add(lineViews);

// 设置子View的位置

int left = getPaddingLeft();
int top = getPaddingTop();

// 行数
int lineNum = mAllViews.size();

for (int i = 0; i < lineNum; i++)
{
// 当前行的所有的View
lineViews = mAllViews.get(i);
lineHeight = mLineHeight.get(i);

for (int j = 0; j < lineViews.size(); j++)
{
View child = lineViews.get(j);
// 判断child的状态
if (child.getVisibility() == View.GONE)
{
continue;
}

MarginLayoutParams lp = (MarginLayoutParams) child.getLayoutParams();

int lc = left + lp.leftMargin;
int tc = top + lp.topMargin;
int rc = lc + child.getMeasuredWidth();
int bc = tc + child.getMeasuredHeight();

// 为子View进行布局
child.layout(lc, tc, rc, bc);

left += child.getMeasuredWidth() + lp.leftMargin+ lp.rightMargin;
}
left = getPaddingLeft() ;
top += lineHeight ;
}

}

/**
* 因为我们只需要支持margin,所以直接使用系统的MarginLayoutParams
*/
@Override
public LayoutParams generateLayoutParams(AttributeSet attrs)
{
return new MarginLayoutParams(getContext(), attrs);
}
  • MainActivity.java
1
2
3
4
5
6
7
8
9
10
11
12
13
14
15
16
17
18
19
20
21
22
23
24
25
26
27
28
29
30
31
32
33
34
35
36
37
38
39
40
41
42
43
44
45
46
47
48
49
50
51
52
53
54
55
56
57
58
public class MainActivity extends Activity {

LayoutInflater mInflater;
@InjectView(R.id.id_flowlayout1)
FlowLayout idFlowlayout1;
@InjectView(R.id.id_flowlayout2)
FlowLayout idFlowlayout2;
private String[] mVals = new String[]
{"Do", "one thing", "at a time", "and do well.", "Never", "forget",
"to say", "thanks.", "Keep on", "going ", "never give up."};

@Override
protected void onCreate(Bundle savedInstanceState) {
super.onCreate(savedInstanceState);
setContentView(R.layout.activity_main);
ButterKnife.inject(this);
mInflater = LayoutInflater.from(this);
initFlowlayout2();
}

public void initFlowlayout2() {
for (int i = 0; i < mVals.length; i++) {
final RelativeLayout rl2 = (RelativeLayout) mInflater.inflate(R.layout.flow_layout, idFlowlayout2, false);
TextView tv2 = (TextView) rl2.findViewById(R.id.tv);
tv2.setText(mVals[i]);
rl2.setTag(i);
idFlowlayout2.addView(rl2);
rl2.setOnClickListener(new View.OnClickListener() {
@Override
public void onClick(View v) {
int i = (int) v.getTag();
addViewToFlowlayout1(i);
rl2.setBackgroundResource(R.drawable.flow_layout_disable_bg);
rl2.setClickable(false);
}
});

}
}
public void addViewToFlowlayout1(int i){
RelativeLayout rl1 = (RelativeLayout) mInflater.inflate(R.layout.flow_layout, idFlowlayout1, false);
ImageView iv = (ImageView) rl1.findViewById(R.id.iv);
iv.setVisibility(View.VISIBLE);
TextView tv1 = (TextView) rl1.findViewById(R.id.tv);
tv1.setText(mVals[i]);
rl1.setTag(i);
idFlowlayout1.addView(rl1);
rl1.setOnClickListener(new View.OnClickListener() {
@Override
public void onClick(View v) {
int i = (int) v.getTag();
idFlowlayout1.removeView(v);
View view = idFlowlayout2.getChildAt(i);
view.setClickable(true);
view.setBackgroundResource(R.drawable.flow_layout_bg);
}
});
}

四 总结